Click Play for Installation Instructions
Adding Wazala Online Store to your MAGIX/Xara Web Designer site is simple and easy. The MAGIX/Xara Web Designer platform powers websites professionally. It plays beautifully with Wazala.
Step By Step
The following are step by step instructions for adding your Wazala Ecommerce Store to your MAGIX/Xara Web Designer site
Step 1: Make sure you have a Wazala Account Setup
If you do not have your Wazala account setup yet, you must sign up. The process is easy and only takes a few minutes. You can always come back and proceed with adding your Wazala Ecommerce Store to your MAGIX/ Xara Web Designer site.
Step 2: Go to MAGIX/Xara Web Designer
Within MAGIX/Xara Web Designer choose the page you wish to add Wazala to
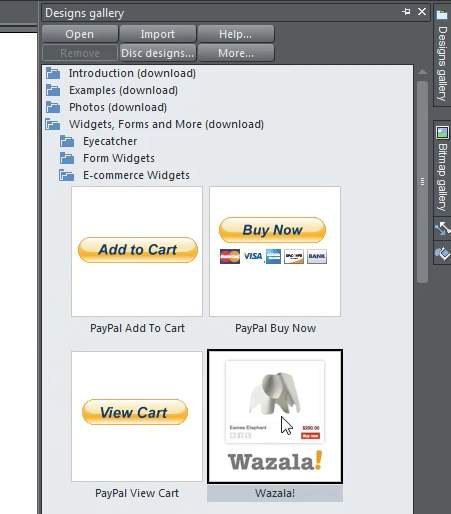
then go to the Designs Gallery from the right side menu.
Click on Widgets, Forms and More, then choose E-commerce Widgets.
You will see Wazala Online Store in the list. Simply drag this to your page.
A window will open directing you to the Wazala website.
Step 3: Sign into Wazala
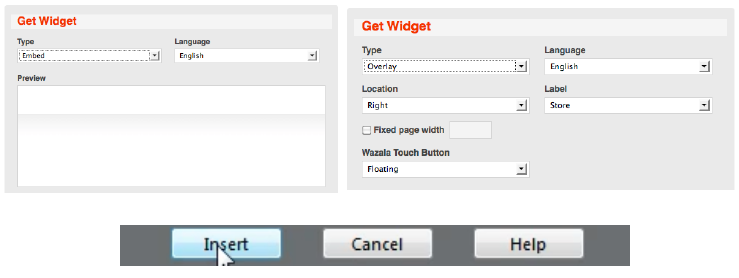
Within the open page of Wazala in MAGIX/Xara Web Designer click on signin and sign into your Wazala account, go to the Get Widget tab. Here you have options, decide on your code options. Either you choose to embed your store into a page, or overlay. For more info on choosing your option for the code, you can watch the video on this page. Once you choose your options then simply click on insert
Step 4: Publish your site
Once you click on insert you will notice that there is an item on your web page within MAGIX/Xara Web Designer. If you choose to embed the store you can simply drag it around the screen to place it as you wish. Simply then preview and publish the site.
That's it, you now have the Wazala Online Store on your MAGIX/Xara Web Designer site!
